Home Studio

How to set up the production environment with minimal effort and of course budget. Something about minimal configuration that is need for music production. Production environment might be quite complex issue but I don't want to talk about concepts of big recording and production studios. I would like to focus on the simplest concept as possible. Give some advices what and how, something that would help me at my beginning.
...
Maybe at a first glance this topic doesn't seems so crucial but it's an important issue regarding the quality of your production. If you want to design your own sound to an appropriate quality level with your own style then you not only need to have skills but also a good environment. This is not about expensive studio equipment , in fact, this is not about equipment at all, it is about physical space and room.
...
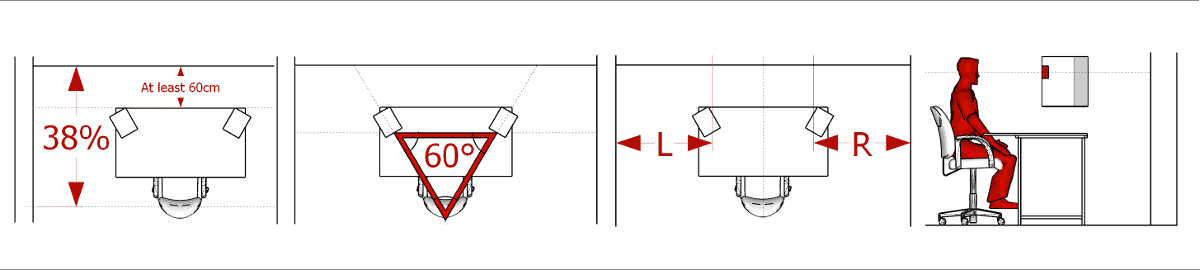
Doesn't matter if your production is focused on the rock music, hip-hop beats or electronic music. All styles have common attribute - the track has to be in appropriate sound quality. In order to achieve it is need to have good sounding room. For this purpose is need to do several things - properly layout the setup (speakers, listening position..) and install several elements that can affect the room sound in the right way. The reason why to do that are sound reflections that behave differently regard to its frequency. I don't want to go into physical theory details, but for better understanding is good to be familiar with these few basics.
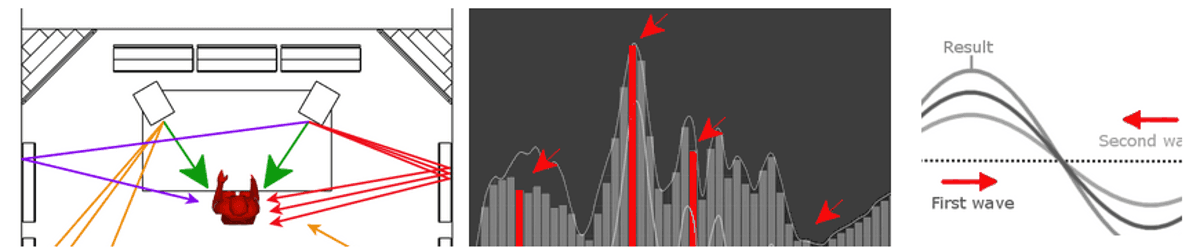
We can start with simpler ones and it is undesired behave of the sound waves in the middle and the high frequency range - their reflections and unwanted caused effects.
...
If your studio has at least one pair of parallel reflective surfaces and I'll bet it has (the walls or the floor and ceiling), then you can observe a physical effect called standing waves. Standing waves are a big enemy because they distort the bass and lower mid-range frequencies from 300 Hz on down.
Standing waves are created when the sound is reflected back and forth between any two parallel surfaces in your room and the sound wavelength is equal to the dimensions between these parallel walls. They affect frequencies below 300 Hz.
...
There are different opinions on this part, whether it is necessary or not. According to my humble opinion if you believe it seriously, then it is very important step. The Treatment of how you design your room can significantly improve your production flow and save a lot of wasted time by revealing all the pitfalls of sound design.
...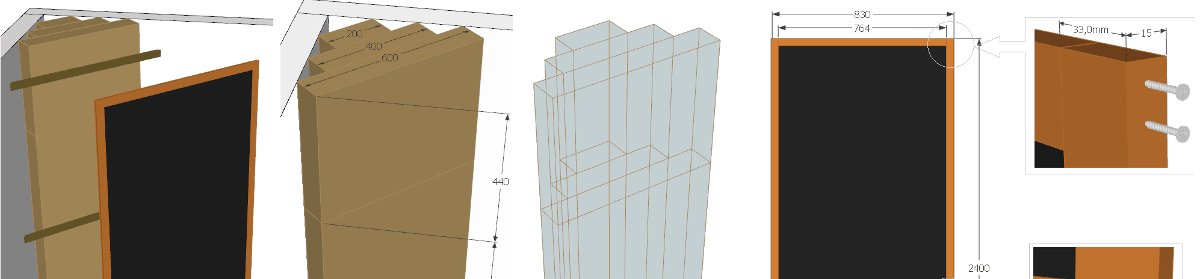
As described in the previous article the distortion on low frequencies is most significant in the corners of the room. When using your home or a small production or recording studios which are limited by budget it is often the design of simple DIY corner bass traps which is only one way of how to at least partially resolve this problem. One bass trap was made for each corner. The design of a corner bass trap is very simple and consists of three main parts:
...
We can now move on to the next chapter in the construction of my production room. After the corner bass traps were complete it was necessary to take care of the side walls in the early/first reflection zone, so I built several acoustic panels for the side walls and also a couple for use as cloud absorbers hanging down from the ceiling. The acoustic panels are cheap and very simple.
Is important to mention that these acoustic panels are basically very universal. If you decide to treat the room in a simple way this is all you need is to create a several of these panels and place them in the right places - surfaces (walls, ceiling) and corners as well.
The panels consist of three main parts:
...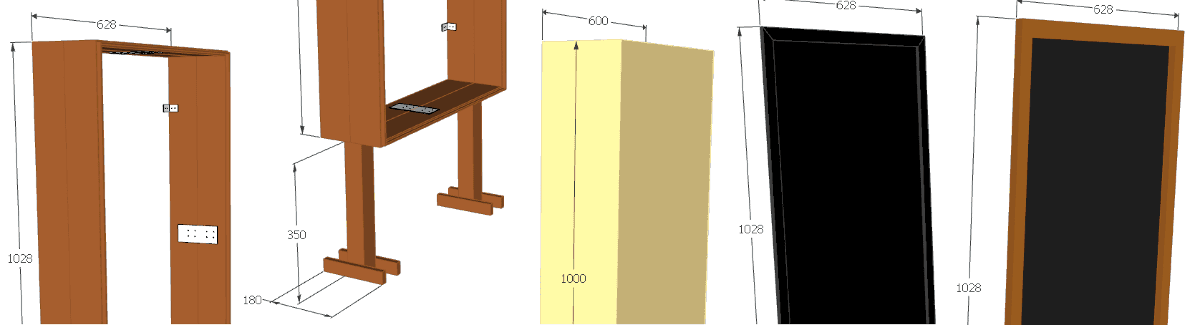
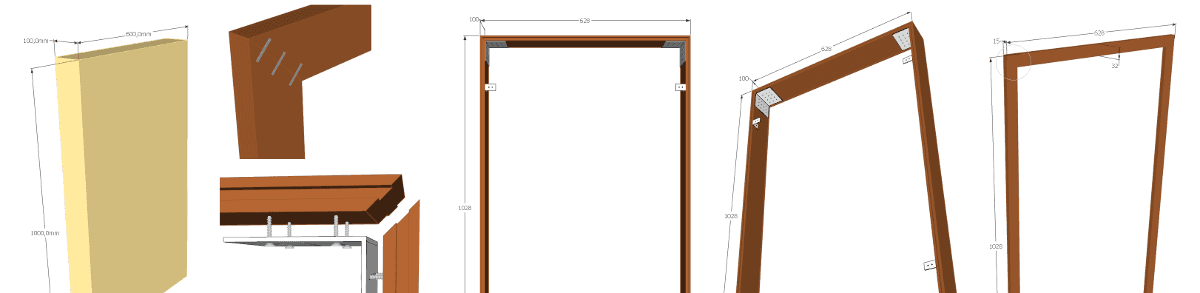
The front wall of my room (behind the speakers) contains the window, so I had to resolve the acoustic treatment of this section of the room by stand-alone solutions. I decide to make acoustic panels from an acoustic absorbing panels, placed in to a wooden frame standing on simple legs made by few wooden laths. On the front and back side, I covered the acoustic material by breathable fabric (pinned on the light wooden frame). Since panels are relatively thick and are situated about 30 cm from the front wall, they can also absorb also part of the low frequencies range. This contributes to better room acoustic response (less distortion) on the bass sounds so it also has the function of bass trap.
...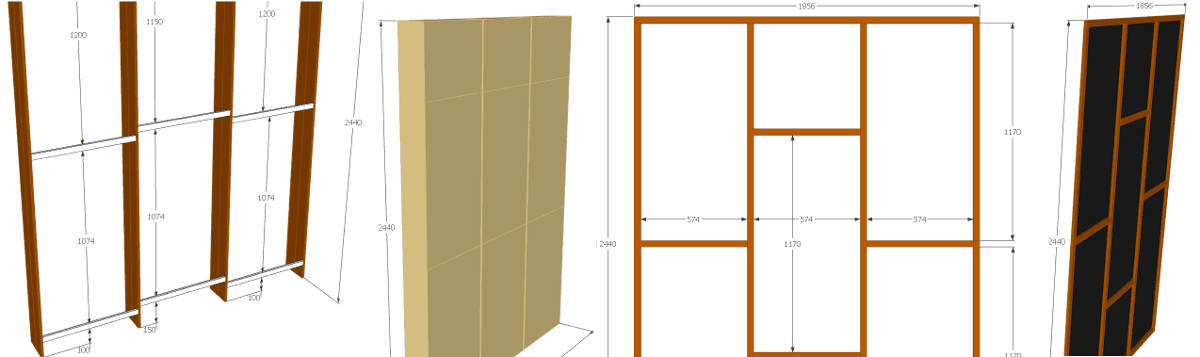
Once I had completed the acoustic treatment of the corners, the front of the room, side and cloud acoustic panels, the time came to complete the last part - the back wall treatment - placed on the wall behind your ears. I decide to solve this by the execution of one construction mounted directly to wall without the need to create a back side of the panel. Again the construction consist of three main parts:
...